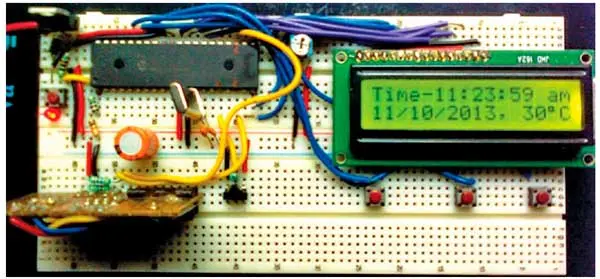
Presented here is a simple realtime clock with temperature logger. The project shows time, date and real-time temperature on the LCD. The logger records the maximum and minimum temperature for each day and can keep entries for 51 days. The recorded temperatures can be viewed any time together with the dates. The temperature is sensed via single-wire temperature sensor and the maximum and minimum temperatures for each day are stored in EEPROM via I2C protocol. Fig. 1 shows the author's prototype.

Fig. 1: Author’s prototype
PARTS LIST | |
Semiconductors : | |
IC1 | PIC18F452, microcontroller |
IC2 | DS1307, RTC |
IC3 | AT24C02, EEPROM |
IC4 | 7805, 5V regulator |
SENSOR1 | DS18B20, 1-wire digital thermometer |
LED1 | 5mm LED |
LCD1 | 16x2 LCD |
BR1 | Bridge rectifier module, 1A |
Resistors (all 1/4-watt, ±5% carbon): | |
R1 | 680-ohm |
R2, R7-R9 | 4.7-kilo-ohm |
R3 | 10-kilo-ohm |
R4, R5 | 2.2-kilo-ohm |
R6 | 100-ohm |
VR1 | 10-kilo-ohm preset |
Capacitors: | |
C1 | 470μF, 25V electrolytic |
C2 | 0.1μF ceramic |
C3 | 10μF, 16V electrolytic |
C4, C5 | 22pF ceramic |
Miscellaneous: | |
X1 | 230V AC primary to 12V, 500mA secondary transformer |
S1-S4 | Tactile switch |
XTAL1 | 10MHz crystal oscillator |
XTAL2 | 32.768kHz crystal oscillator |
BATT.1 | 3V battery |
CON1 | 2-pin terminal block connector |
Circuit and working
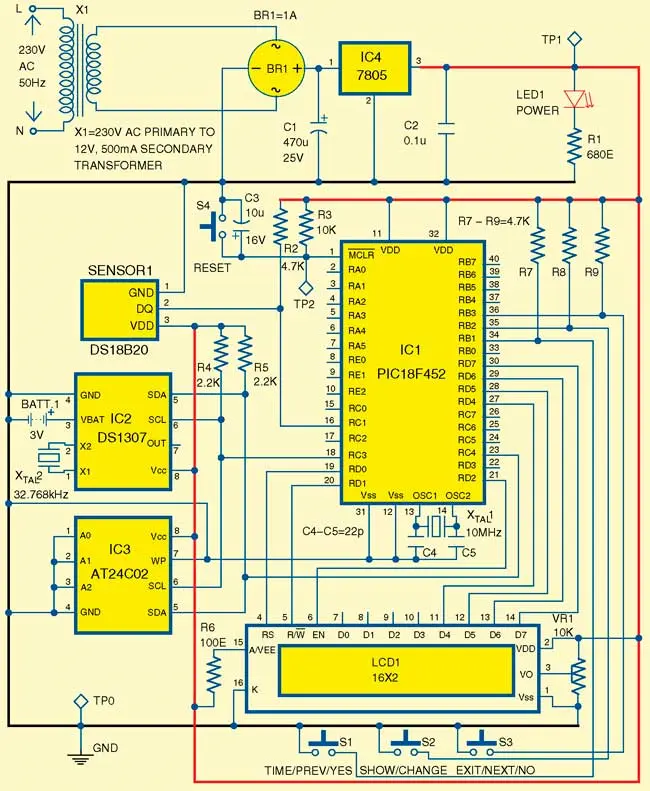
Fig. 2 shows the circuit diagram of realtime clock with temperature logger. The circuit is built around microcontroller PIC18F452 (IC1), serial I2C real-time clock DS1307 (IC2), EEPROM AT24C02 (IC3), single-wire temperature sensor DS18B20 (SENSOR1) and 16x2 LCD.

Fig. 2: Circuit diagram of real-time clock with temperature logger
Test Points | |
Test point | Details |
TP0 | 0V, GND |
TP1 | 5V |
TP2 | Low when S4 is pressed |
Transformer X1 is used to power the circuit. The secondary of X1 is fed to bridge rectifier BR1 which is a general-purpose 1A bridge rectifier. The rectified output is filtered through capacitor C1 and fed to 5V regulator IC4 to get a regulated 5V supply to power the circuit. LED1 is used to indicate the input power status of the circuit and current through it is limited by resistor R1.
Single-wire temperature sensor. The real-time temperature is sensed by single-wire digital thermometer DS18B20. The sensor provides 9-bit to 12-bit Celsius temperature measurements and has an alarm function with nonvolatile user-programmable upper and lower trigger points. DS18B20 communicates over a single-wire bus that by definition requires only one data line (and ground) for communication with a central microprocessor. It has an operating temperature range of -55°C to +125°C and is accurate to ±0.5°C over the range of -10°C to +85°C. In addition, the DS18B20 can derive power directly from the data line ('parasite power'), eliminating the need for an external power supply. But we have powered it externally for this project. The DQ pin 2 of the sensor DS18B20 is interfaced to port pin RC1 of microcontroller IC1 using single-wire protocol through a pull-up resistor R2. Single-wire protocol was developed by Maxim Integrated; it needs only one wire for communication and we can connect many devices with a single wire and access each of them separately according to our need.
Real-time clock. Serial I2C-based real-time clock DS1307 provides the current date and real time to be displayed on the LCD. DS1307 is a low-power, full BCD clock/calendar with 56 bytes of NV SRAM. Address and data are transferred serially through I2C bi-directional bus. The clock/calendar provides seconds, minutes, hours, day, date, month and year information. The end of the month date is automatically adjusted for months with less than 31 days, including corrections for leap year. The clock operates in either the 24-hour or 12-hour format with AM/PM indicator. The DS1307 has a built-in power sense circuit which detects power failures and automatically switches to the battery supply. A 32.768kHz crystal oscillator provides clock to DS1307 and a 3V battery connected at pin 3 provides the backup supply when Vcc is not present. The SCL and SDA pins of DS1307 are interfaced to port pins RC3 and RC4 of microcontroller IC1 through pull-up resistors R4 and R5, respectively.
EEPROM. The minimum and maximum temperature of each day is stored in serial EEPROM AT24C02. It provides 2048 bits of serial electrically erasable and programmable read-only memory (EEPROM) organised as 256 words of 8 bits each. The device is optimised for use in many industrial and commercial applications where low-power and low-voltage operation is essential. The microcontroller IC1 logs maximum and minimum temperatures for each day in EEPROM. If the EEPROM gets full, it shifts the contents of EEPROM by five positions to log new data. Address pins A0, A1, A2 of EEPROM AT24C02 are connected to ground and the serial communication pins SCL and SDA are interfaced to RC3 and RC4 of microcontroller IC1.
Microcontroller. PIC18F452 is the brain of the complete system. It is a powerful 10 MIPS CMOS FLASH-based 8-bit microcontroller and is upwards compatible with the PIC16C5X, PIC12CXXX, PIC16CXX and PIC17CXX devices, thus providing a seamless migration path of software code to higher levels of hardware integration. The PIC18F452 features a 'C' compiler-friendly development environment, 256 bytes of EE-PROM, self-programming, an ICD, two capture/ compare/PWM functions, eight channels of 10-bit analogue-to-digital (A/D) converter. Its synchronous serial port can be configured as either 3-wire serial peripheral interface or the 2-wire inter-integrated circuit bus and addressable universal asynchronous receiver transmitter.
The microcontroller continuously reads date and time from I2C-based real-time clock IC2, temperature from single-wire digital thermometer SENSOR1 and shows them on the LCD. It also logs the maximum and minimum temperatures of the day in twin-wire serial EEPROM IC3. Port pins RD4 though RD7 of IC1 are connected to data pins D4 though D7 of LCD1, respectively. Port pins RD0 through RD2 of IC1 are connected to control pins RS, R/W and EN of LCD1. Multifunction switches S1 through S3 are connected to port pins RB1 through RB3 of IC1.
Software
The software program is written in 'C' language and compiled using MPLAB IDE. MPLAB IDE is a compiler for PIC. The program is burnt in the microcontroller using a suitable PIC programmer. Following fuse bytes are forced through source code:
#pragma config OSC=HS,OSCS=OFF
#pragma config PWRT=ON,BOR=ON,BORV=45
#pragma config WDT=OFF,LVP=OFF
#pragma config DEBUG=OFF,STVR=OFF
EFY Note |
The source code of this project is included in this month’s EFY DVD and is also available for free download on source.efymag.com website. |
Construction and testing
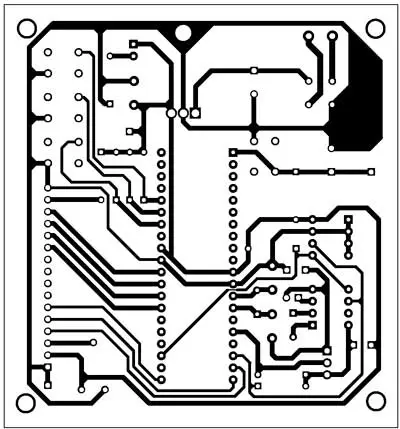
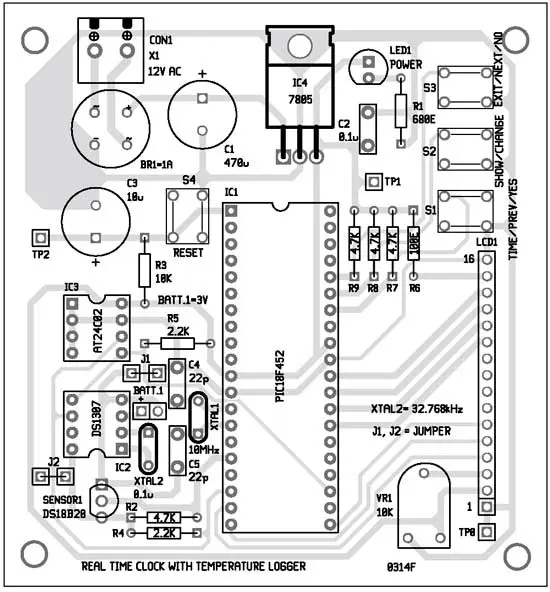
An actual-size, single-side PCB for the real-time clock with temperature logger circuit is shown in Fig. 3 and its component layout in Fig. 4. Assemble the circuit on the PCB to minimise assembly errors. Use IC base for microcontroller IC. To test the circuit for proper functioning, verify the voltage levels as shown in the test points table.

Fig. 3: An actual-size, single-side PCB for real-time clock with temperature logger

Fig. 4: Component layout for the PCB
When the system is turned on for the first time, it shows a welcome message, and after that it shows screen like the one in Fig. 5 because RTC is off. We now have to set time in it. To set the time, press any of the switches and the display will show options as in Fig. 6.

Fig. 5: Display when RTC is off

Fig. 6: Time setting menu
Now press switch S1 and the display changes to as shown in Fig. 7.

Fig. 7: After pressing S1
You can navigate the cursor by pressing switch S1 for left and S3 for right. To change a digit, press switch S2. After setting all the digits, press S3 again to write this time in RTC as shown in Fig. 8.

Fig. 8: Write in RTC
Now press S1 or S3 as your wish. If you choose S1, EEPROM will be cleared. Refer Fig. 9.

Fig. 9: EEPROM erasing menu
It will take a couple of seconds to clear the EEPROM. After clearing the EEPROM, the system will display time, date and temperature as shown in Fig. 11.

Fig. 10: Erasing EEPROM in progress

Fig. 11: Time, date and temperature display
To see logged temperature, press any key while the system is showing time and date. It will show the display as in Fig. 6. Now choose S2 for SHOW LOG option; it will show most recent logged data as in Fig. 12.

Fig. 12: Logged data display
This means:
Date of log: 17/01/14
Minimum temperature: 14°C
Maximum temperature: 15°C
You can see other logged data of previous or next day by pressing S1 or S2 switches. Press S3 switch to exit from log.
Author: Sanjib Bhuiya

